
This page last modified: 28 September 2013
This game was the third in a series of MSH games against Rhys Batchelor using Keith McNelly's scenario generator. The year was again 1979, with me again me using Czechoslovakians drawn the 3rd Motor Rifle Division, meaning mostly Regular troops, but with a significant number of Green units as well. Unlike in our previous game, Rhys was now using a West German force based on Leopard 1 MBTs and Marder ICVs.
As befitting the terrain near the Czechoslovak-West German border, the table was reasonably densely populated with features. A deep river ran across what turned out to be the centre and right-hand corner of Rhys' side of the, albeit bridged in three places. There were many rolling hills, but lines of sight from them were not too dominating, as there were also many woods and tree shelter-belts between them; light hedgerows further complicated things. After rolling the dice and choosing sides, three of the objectives were found on my side of the table, with the missing one on his side being the central one.
We were meeting in an Advance to Contact game, with him getting a free "A option" while I got to position one battalion 300 mm into the table instead. That wasn't all that much help to me as it tuned out, so I went for an A option too, making 860 points in total. My list was similar to that used in the first game of this series: a BVP-equipped motor rifle regiment, the 5th, reinforced with two tank battalions from the 33rd Tank Regiment, plus the divisional recon battalion (the 3rd). However, with the A option chosen, I had added in the 33rd's regimental HQ, amongst other things. Here's how the table looked at the end of the first turn, with me at the bottom, the objectives marked with orange dots, and my initial command arrows drawn in:
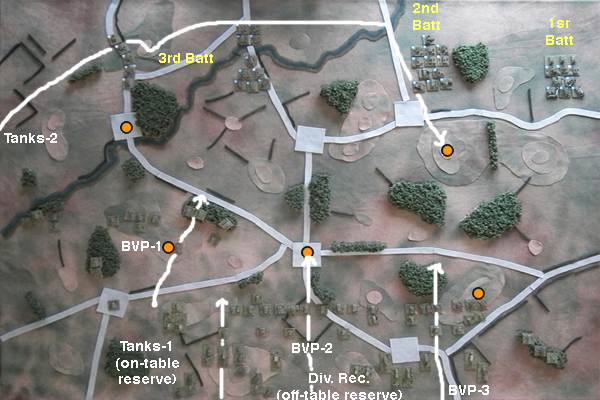
Mt first BVP battalion was on my left, starting 300 mm ahead of the rest of my force. With the regimental NBC recon attached (in addition to a company of the regiment's tank battalion), it had a break point of 8. It would seize the first objective on my left, and then tie up any enemy to its front as I waited for my flank march too arrive. This, as before, was a plain battalion of T-55As, and thus just seven strong in total, and being rated Green, it had a breakpoint of just 3. My other tank battalion, including some T-72s, plus various attached regimental and divisional companies, had a breakpoint of 8, and took up an on-table reserve position in my centre-left, awaiting further instructions. My second BVP battalion, with the 5th's regimental HQ plus recon company, had a breakpoint of 9, and was tasked with seizing the central objective in the centre of the table. Behind it, and off-table, to keep Rhys unaware of its existence, was a further reserve battalion: the divisional recon battalion, which was kept concentrated rather than attached out, and which had a breakpoint of 5. On the right was my third BVP battalion, with attached regimental anti-tank company and engineering platoon, plus various divisional towed AA guns; because it was rated Green, its breakpoint was only 7.
This unit was going to be in a bit of trouble, because it turned out that two of Rhys' 3 battalions were on its side of the table. Rhys' force was tough, but also very small. He only had 3 dozen elements on the table - and nothing off-table except for indirect fire assets. Expecting LARS rocket launchers, I had brought along a battalion of M-46 130 mm guns to try and take them out before doing too much damage - but I also expected this to be countered in turn by M107s on his side, which is exactly what happened. That did however leave half of my MRLs free to operate unhindered later in the battle (M107s only get 4 rounds of fire): I had 3 units of them this game - two regimental plus the divisional ones; the later being modern vz. 70s, and thus armoured.
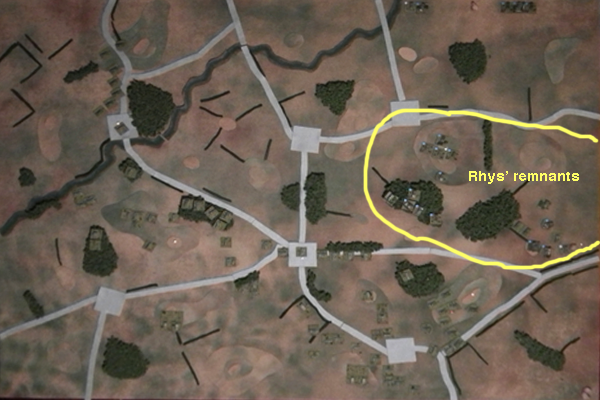
Rhys' two battalions on my right moved well forward, so the lead elements were just into my half of the table, and a firefight broke out there with my Green 3rd battalion. This unit had my divisional 152 mm howitzers in direct support, but they only managed to get off one rather ineffectual round of fire as it turned out - WarPac 2 artillery is not the easiest thing to summon, and the artillery observer was poorly sited, so I had to try and use other elements as observers. Rhys' 3rd battalion hung back further, with part of it garrisoning the village on my left, and the bulk of it concentrated as a reserve. A tempting target for my rockets... Here's how things looked by the end of the 3rd turn:

Back to my MSH index.