
This page last modified: 26 September 2013
This was another game using Keith McNelly's scenario generator against Rhys Batchelor, only this time, it wasn't WW2, but 1979, with him again using Americans from the 3rd Armored Division IIRC, and me using Czechoslovakians - the 3rd Motor Rifle Division, meaning mostly Regular troops for me, but some Green units as well. The list I was using for this game was reasonably tank-heavy (the game turned out to be a Hasty Attack, so my base list was 800 points' worth of gear), with an infantry regiment (the 5th Motor Rifle) reinforced with a couple of tank battalions (from the 33rd Tank regiment) plus the division's reconnaissance battalion (the 3rd).
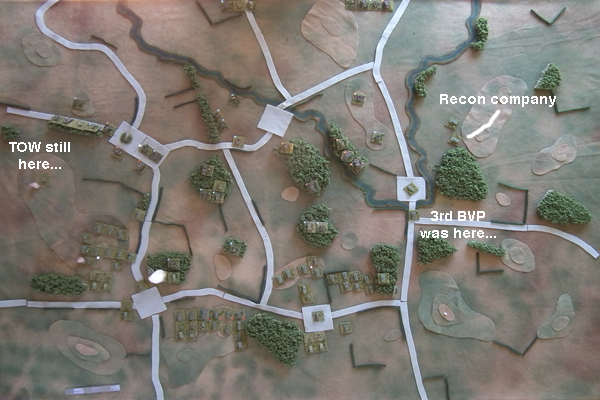
The terrain was reasonably varied and fairly dense. A shallow river looped around the centre of what turned out to be Rhys' side of the table, and there were rolling hills distributed throughout all sectors. Woods and light hedgerows were also plentiful. Three of the 5 objectives were on my side of the board, with the sector missing one on Rhys' side being on the right (from my perspective).
Rhys defended reasonably far back into the table, concentrating most of his force more toward my left, which was where, after all, the objectives were also concentrated. His guys mostly occupied the woods in the centre of the table, but also with a substantial force held behind a tree-belt on my far left.
My first motor rifle battalion, in BVP-1s, was on my left flank; like the other two infantry battalions, it had a company of T-55A tanks drawn from the regiment's tank battalion in support. Also attached were the regiment's HQ, engineering platoon and anti-tank platoon, giving a break point of 9, plus a company from the divisional recon battalion (the 3rd). Immediately to its right, and supporting its advance, was the first tank battalion. This had one company of T-55s and two of T-72s - these four stands of T-72s being the only ones the Czechoslovakians had at the time, having been supplied by the Soviets for evaluation purposes. Attached to this were the divisional sapper (light engineer) company and most of the divisional AA assets: four stands of towed 57 and 30 mm AA guns drawn from the 13th AA regiment, giving the unit a breakpoint of 7. My second tank regiment, just 7 stands of T-55s in total, was tasked with making a deep flank march on my left in support of my main thrust. This unit was rated Green rather than regular, so had a breakpoint of only 3.
Here's how the table looked at the end of the first turn, with me at the bottom, the objectives marked with orange dots, and my initial command arrows drawn in:
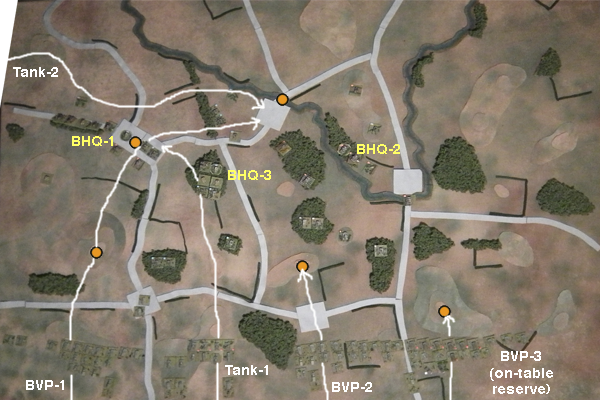
As can be seen, my second infantry battalion occupied the centre of the table and was tasked with taking the hill-top objective immediately in front of it, but advancing no further; it should find enough opposition to keep it occupied for quite some time. Attached to it was the regimental NBC recon platoon, giving it a breakpoint of 8, plus a company from the divisional recon battalion. My third battalion, on my right, was to act as an on-table reserve. Attached to this unit was the regimental recon company plus the third of the divisional recon companies; but as the battalion was rated Green, it only had a breakpoint of 6.
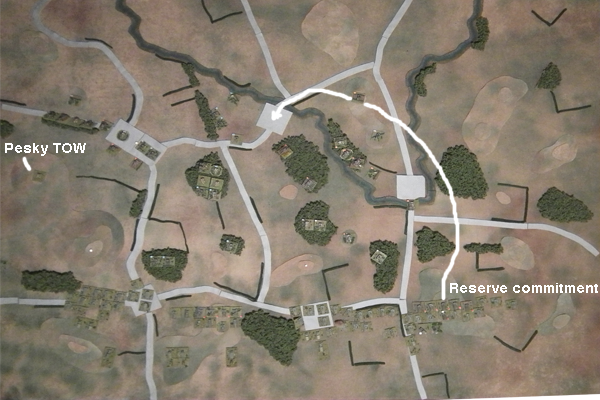
Rhys had a single TOW-equipped M113 on the hill to my far right, just where my divisional recon company over there was aiming for. My other two divisional recon companies were BVP-equipped, and would have probably dealt with this interloper, but the one over here was the deep recon company, meaning it was equipped with only OT-65s, and thus in no position to do any actual fighting, these being armed with nothing more than pintle-mounted machine guns. During the second turn, it became evident I had made a mistake in the positioning of my third BVP battalion. By advancing to the top of the hill in front of them (in case their HQ and recon elements could see something to call down rocket fire on), as opposed to stopping just before the crest, they potentially exposed themselves to enemy fire for a turn. Which is exactly what happened. They took no damage, but had to be given orders immediately...
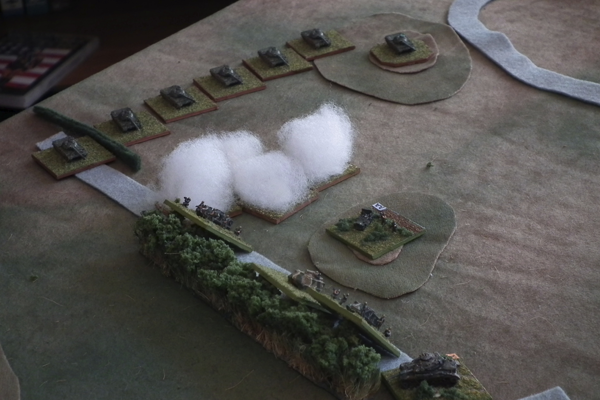
By the fourth turn the fighting had started in earnest. The BVP battalion had crested the large hill in front of it, and was now also attacking the American company occupying the foremost wood to its right. Rhys called in smoke here from his battalion mortar stand to help slow down my assault.
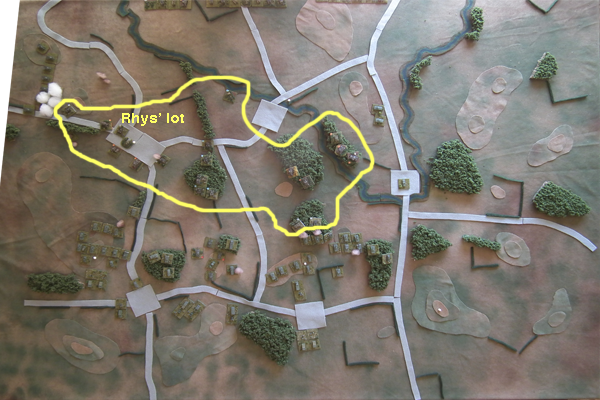
Over the next couple of turns, my central units advanced on Rhys' positions: the close terrain here severely hindered firing arcs and ranges, and also made calling in rocket strikes, whether from my regimental or my divisional assets, rather impractical. But the advance was not without effect. Rhys' companies were protected by their woods, but this also meant they were effectively isolated from each other, so that each company had to take on a larger number of opponents without much in the way of support.
Nonetheless, my 3rd battalion, having been committed too early, was taking casualties at a faster rate than was planned for, and being Green, this wasn't a good thing. It broke in the 5th turn, although the attached divisional recon company, having its own morale base (and being Regular to boot) stuck to the original plan. So things weren't looking too bad from Rhys' point of view at this stage.
Alas for the Americans, my flank march arrived next turn. This was excellent timing - a rare happening given it needs a 6 on the dice to get on-table in any given bound! Rhys had to call down smoke from his brigade's off-table M109 howitzers to stop the dangling flank of his 1st Battalion from being wiped out immediately by half a dozen juicy flank shots...
By the end of next turn, the 7th, I had cleaned out the wood in front of my left, so that the 1st BVP battalion was in a position to advance and support my recently arrived tank battalion; and my right-most recon company had worked their way across the river and behind his positions and were killing his battalion mortar and AA stands that had been stationed to the rear, while his M109s were still pouring smoke ahead of my advancing T-55s on my far left. All his units were now taking heavy casualties...
The rather inevitable end came in the next bound: continued American casualties saw failed moral checks, and Rhys was left with just 9 stands on the table by the end of the turn. So Rhys bagged a couple of victory points from breaking my Green BVP battalion, and was still holding two contested objectives, albeit temporarily, giving four victory points. IIRC, I had amassed 10 victory points already, and was going to get another 6 if we had kept playing, so a comprehensive victory to the Czechoslovakians.
My artillery didn't play that much of a role in this game - my rockets found it hard to get a shot in, because spotting enemy targets was none too easy, and Rhys' M107s destroyed the regimental ones as soon as they fired, and effectively neutralized my divisional 152 mm howitzers as well. On the other hand his didn't too much either: his M109s had to spend the most important two turns of the game trying to screen his flank with defensive smoke rather than killing any of my guys.
Back to my MSH index.