
This page last modified: 25 September 2013
This was my second WW2 game against Rhys Batchelor using Keith McNelly's scenario generator. As with our previous game, the year was 1945, but the action had shifted to the Eastern front. Rhys was using a Panzergrenadier force, with Panthers as the tank component, while I used a force taken from my Czechoslovakian 1st Corps. My force was essentially the Corps' 1st Brigade, reinforced with various tank units from elsewhere in the Corps. The 1st Battalion has a (weakened) T-34/85 battalion from the Corp's Tank Brigade attached, 4 elements' worth, as did the 2nd Battalion. The 3rd Battalion instead had the Corps' self-propelled guns attached - 3 stands of ISU-152s. This battalion also had the Brigade HQ attached, plus the Corps' recon company. Each of these units had a break point of 10, not counting their heavy mortar assets which were likely to be detached during the course of the game. Finally, the tank battalion from the Second Brigade, somewhat weakened at 5 elements, with accompanying tank-borne infantry, for a break point of 5, rounded out the force.
The Brigade's ZiS-3 guns were not used, since these have much less utility in attack than defence, and it turned out I was conducting a Hasty Attack; I used an "A" option to provide myself with the recon company (3 elements of SMG-armed cavalry), the second heavy mortar section (3 elements of 120 mm M), and a Sturmovik (rated "bombs 3"). My total indirect fire assets were thus 6 stands of battalion-level 82 mm mortars, 6 stands of brigade-level 120 mm mortars, 3 stands of brigade-level 122 mm gun-howitzers, and, in the counterbattery role, the 3 stands of corps-level 152 mm howiters. The 1st Corps' artillery assets were considerable...
After laying out the terrain, a large (two sector) village could be found straddling a shallow river on one side of the table. Various woods were scattered around the table, and there were plenty of light hedges to shorten lines of sight. However, the terrain was fairly flat, with few hills (none higher than two contours), so the table was more open than many we play on.
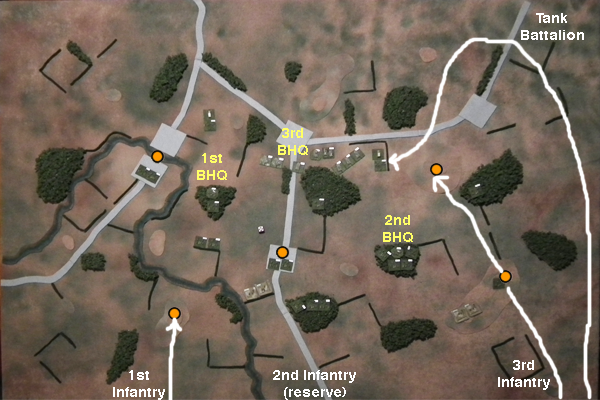
Rhys placed his three defending battalions relatively centrally. Because of the expense of his Panthers, they were quite small, and in need of mutual support. He was essentially giving up two of the three objectives on my side of the table, at least initially. Here's how the table looked after his troops had been positioned, with my table edge being at the bottom, the 5 objectives being marked with orange dots, and my initial command arrows being drawn in:
Rhys immediately started to feel it was going to be a bad day when my Sturmovik arrived on-table immediately, dropped its bombs, and took out the company on the objective hill in front of my right-hand units, so I wasn't going to be slowed down there at all. This was now twice in a row my Sturmovik had arrived on the first opportunity and scored kills with all three attack rolls, because exactly the same thing had happened against Keith McNelly in August.
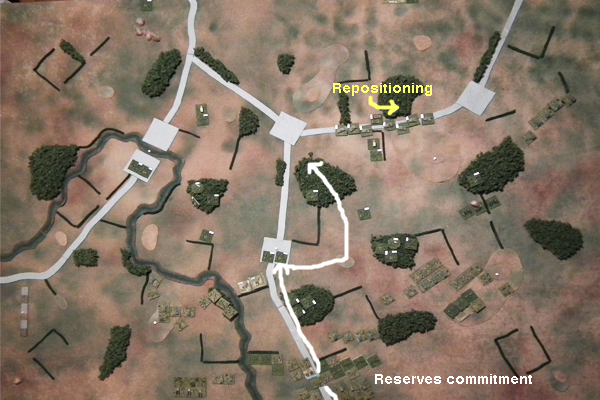
At the end of the second turn, I decided to commit my reserve, as it was looked like his small force would be vulnerable to being overwhelmed by sheer numbers if I could attack it in many places at once. So I launched it straight up the middle, to prevent him reinforcing the troops facing my right hook, which were now starting to redeploy towards my rapidly advancing tank-born infantry battalion. Meanwhile, the 3rd battalion was about to assault the defended wood in front of it, backed by the Corps' heavies: the ISU-152s.
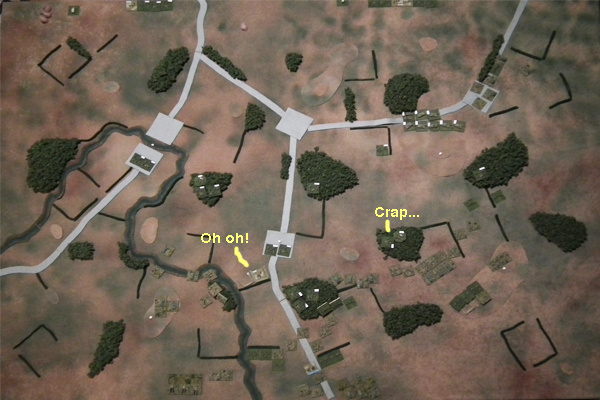
During the fourth turn, the big guns made light work of the woods protecting the German grenadiers and combat engineers in front of them, rapidly cutting the defenders down to size when combined with advancing SMG-armed companies, while the combined 1st and 2nd battalions looked certain to overwhelm the defenders in front of them. And on my right flank, the German reserve had all sorts of trouble repositioning itself, with hardly any elements being able to engage my battalion which had now dismounted its infantry and sorted itself into a decent fighting formation.
And at this point, Rhys decided the writing on the wall was all too clear, and conceded the game. This reinforced what I had suspected from the first time I used the force, against Keith McNelly: it was not only large, but also high quality, and made for a formidable opponent. While the rifle-armed infantry are nothing to write home about, half of the infantry companies are either machine-gun stands, or SMG-armed, which are much more effective, especially on the attack. The artillery is both very numerous and of sufficient calibre to do a decent amount of damage. The armour has an excellent combination of mobility, defensive, and offensive capabilities: I was rather surprised to find out the T-34/85s had an AI factor of 6, so they have no real weakness at all, unless you count their price, but even this is mitigated by the Soviet 0.9 times points multiplier. So the only thing that is really working against you is the poor 3C - but for some reason this doesn't seem to be quite the issue it is with say, WarPac-era Czechoslovakians.
Back to my MSH index.