
This page last modified: 27 October 2013
This game saw me pitted against Aaron Bell, who wanted to field some of his newly acquired Soviet gear. Accordingly, I chose to face him using some of his own American troops. Aaron set up a good portion of the terrain the night before, which I then modified in the morning while he was out doing some family business, mostly to make it more dense and thus a bit more like southern West Germany. The game kicked off after lunch, and we had determined the sides and the objectives. The third of the table with only one objective was on my right, and it was positioned very close to the centre-line of the table, so the battlefield was unusually balanced in that regard.
Aaron's force was modelling some of the leading elements of the 18th Motor Rifle Division in the very first day of "the conflict", just after it had crossed the West German border, so it included the Division's recon battalion. My own force was a scratch force put together from two weakened battalions from the 3rd Brigade of the US 3rd Infantry Division, plus a troop drawn from the 2nd Armored Cavalry Regiment that was assigned to the same defensive sector (we were fighting a meeting engagement, and using just 600 base points each; I used an A option to make sure my my artillery was up to strength, and to fill in some of the gaps in my infantry battalion's numbers). So I had a rather weak brigade, with 3 manoeuvre elements, but with the equivalent strength of only two full battalions.
Here's how the table looked at the end of the first turn, with me at the bottom, the objectives marked with orange dots, and the initial portion of my command arrows drawn in (these extended further to swing around to the left, but I (correctly) anticipated I would not get that far, at least without new orders, so we can ignore them!).
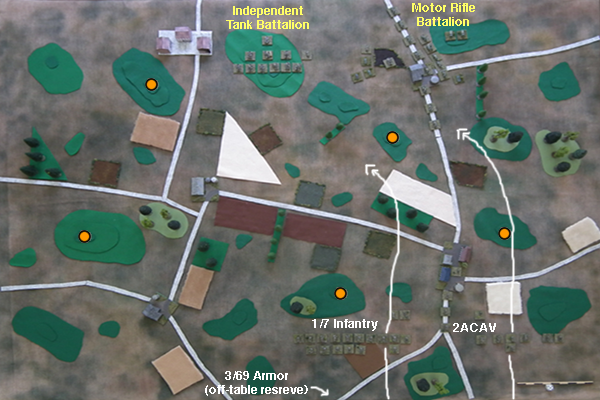
Now the first thing to note is that not only had I decided that I was going to concentrate my forces on my right, but Aaron pretty-well much mirrored this plan, leaving both of the objectives on the third of the table to my left uncontested! On my right, Aaron had a BTR-equipped Motor Rifle battalion, with a company of T-62Ms from the Regiment's tank battalion attached, which advanced straight down the road toward me. Also attached to this battalion was the Division's Recon battalion - a mere 5 element's strong, and mostly with BRDM-2s, so of little fighting value, but perfectly capable of calling in artillery fire. In the centre he had the division's Independent Tank battalion, which took up an on-table reserve position, awaiting developments. The whereabouts of the rest of his force was a mystery (I was anticipating the equivalent of pretty well much a Regiment of troops) - but I strongly suspected a flank march, and a strong one at that. I was hoping this was on my left, and aiming for the uncontested objectives, but - now that I had seen his set-up - I had to assume it was going to come in on my right, unfortunately, because it looked like my own right was vulnerable.
On my right I had the 2ACAV troop, to which my Brigade HQ was attached; I had intended this to my my "right hook" but was no worried that it would get caught by some nasty flanking-marching business. My main force was in the centre - most of the 7th Infantry Regiment's 1st Battalion was here (one company had been swapped out for an M60 Armored company); it was missing some of its TOW-equipped M113s, however. The observer for the 41st Artillery Regiment's 2nd Battalion (of M109A2s) accompanied them. This battalion was tasked with an advance up the right-centre of the table.
In centre reserve, just off-table, was some, but not all, of the 69th Armored Regiment's 3rd Battalion; this was missing one armored company, and another had been swapped for an infantry company from 1/7 Infantry. Though my force was weak in numbers, it at least was well-supported y artillery: in addition to 2/41's M109s in brigade support, my force had the 76th Artillery Regiment's 3rd Battalion assigned in general (i.e. divisional) support: 3 stands of mighty M110A1s. Neither side could count on any air support, given the dog-fighting going on above.
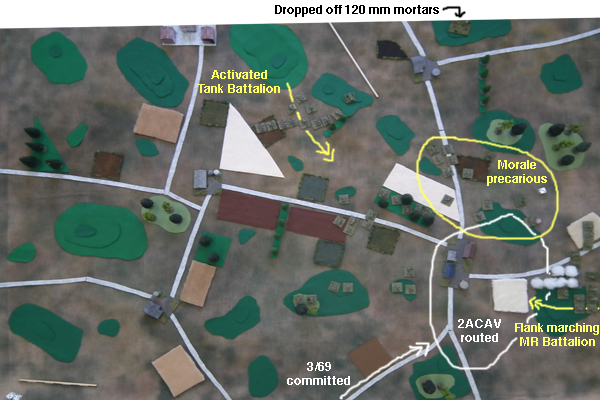
By the end of the turn, my 2ACAv troop had taken the casualties required to force a morale, check which it blew horribly, and the whole lot routed, taking my Brigade HQ with it. At least I got to commit my reserve battalion, which headed off to my right to try and take on his flank marching force, which was another Motor Rifle Battalion with attached tank company. One of the things that caused my 2ACAv grief (aside from taking flanking shots up the date, obviously) was Aaron's Regimental Shilka AA stand, which was attached to his on-table battalion. With an AI factor of 8 (!) and an AT factor of 6, these things are death to anything other than an MBT (which were naturally distracted by his MBTs...), and his stand had no problem taking care of the troop's M113-TOW vehicle. And I could draw some small consolation that the Motor Rifle battalion to my front had taken a lot of casualties, and was almost certain to take a morale check of its own next turn. Unfortunately, the one turn between the 2ACA troop breaking and his battalion possibly breaking meant he could claim the objective they had been fighting over...
During the 5th turn, his battalion, along with the attached recon unit, was duly forced to test morale, and both fled the field, mostly due to taking heavy mortar and artillery fire (those BRDM-2s strangely have only a 2/2 defence even though the equally-armoured BRDM-2 derivatives like the SA-9 have a 3/2 defence), while his flanking battalion pushed forward into the table. In the centre, his tank battalion gingerly approached the armour company and TOW-113 vehicles under 1/7 Infantry's command - something of a Mexican stand-off developed here momentarily as neither of us wanted to be first to move out from behind cover and be exposed to first shots...
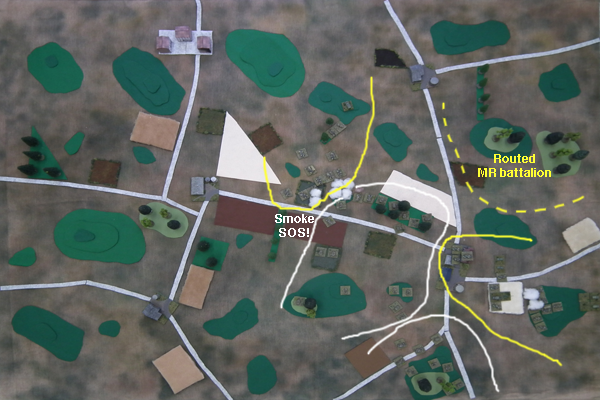
But by the 6th turn, it was clear some of my elements there were simply too exposed, and I started to lay down smoke to try and protect them. However Aaron made good use of his artillery here, taking out both of my TOW stands - he had enough nasty ICM ammunition at his disposal to ensure that when the opportunity arose, he could capitalize on it. Unfortunately, what I didn't do was actually pull my stands back, so eventually I would find myself running out of smoke and still be in the same over-exposed position! Similarly, on my right, I found myself laying smoke around his tanks, who had gained the high ground, and thus counted as in cover on the front slope of the hill (grumble, grumble, I still don't like that rule...) so I couldn't spot them well enough t hit them with damaging fire.
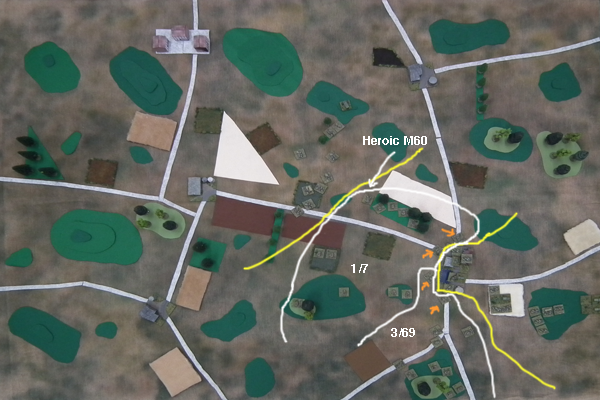
A good proportion of his infantry on my right then moved into the 2-sector town in front of them, along with his AT company, which was now being targeted by my M110s. I saw an opportunity here; I couldn't possibly dig them out of the town, but I could make it difficult for them to influence the battle further, so I promptly moved 4 of my own infantry elements, 2 from each battalion, into the outskirts of the town, meaning he couldn't leave the town either, at least, not without assaulting my guys first. These guys are indicated by the orange arrows in the diagram below.
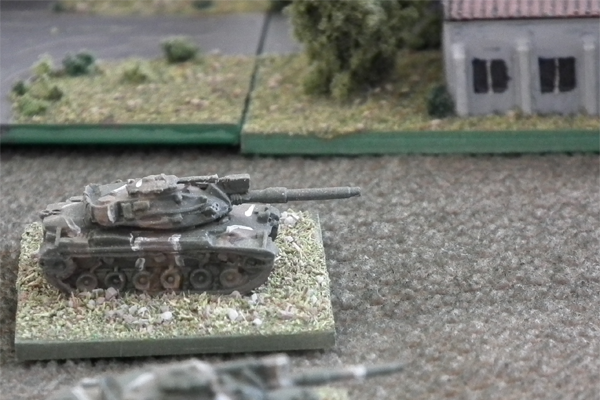
In the left-centre, Aaron was whittling down my forces. One stand of M60s stuck in the open defied a company of T-62s for nearly three full turns before succumbing, buying valuable time, but I had too little materiel there to hold back his tank battalion - although Aaron got a nasty surprise when his tanks rolled up to some of my infantry defending a hedge line, to find out how poorly tanks shoot at combat teams when the teams count as being in cover, and thus on foot and not in their vehicles, and so the tank's AI factor is used and not the AT factor. By the end of the 8th turn, the last of my smoke ammunition had been expended, and both my artillery battalions had but a single turn of HE fire left as well.
At this point I knew I couldn't win the game. I couldn't possibly destroy the Infantry on my right, and my centre battalion was in grave danger of being broken, whereas his tank battalion, while damaged, was after all, tanks - and my anti-tank assets were now essentially gone, so I wasn't going to break that, either. It was just a matter of seeing how badly I had lost. Toting up the points, it came to a low scoring 5 for him to 2 for me - we had both lost a battalion, and both failed to secure (as opposed to contest) much in the way of objectives - although Aaron a least had done somewhat better here than me, and that's what counted! (I also lost one victory point for using up materiel that could have been used elsewhere on the front, in the form of my "A option").
A great game, nonetheless. The two sides were not that dissimilar in terms of numbers - the Americans were of course outnumbered, but not hugely so, and in terms of quality of equipment, there was very little in it; the only thing that was all that different was the definitely more effective targeting systems of the M60s. What tipped the game was Aaron's bold and well-timed flank march. Of course, he was lucky it came on at the time it did, but he had to be bold in making the plan in the first place; I was probably too conservative, in hindsight, with my deployment, and I paid for it.
Back to my MSH index.